Export data from Microsoft SQL Server table to CSV using PowerShell

PowerShell can be easily used to export data from Microsoft SQL server table to CSV file. This task can be done by combination of 2 PowerShell cmdlets Invoke-Sqlcmd and Export-Csv:

Invoke-Sqlcmd -ServerInstance . -Database AdventureWorks -Query "SELECT AccountNumber, Name, CreditRating FROM Purchasing.Vendor" | Export-Csv -Path Vendor.csv -NoTypeInformation


Udemy course: Improve your productivity with PowerShell

Content of exported CSV file can be displayed by following PowerShell command:

Get-Content .\Vendor.csv | Select-Object -First 5


"AccountNumber","Name","CreditRating"
"AUSTRALI0001","Australia Bike Retailer","1"
"ALLENSON0001","Allenson Cycles","2"
"ADVANCED0001","Advanced Bicycles","1"
"TRIKES0001","Trikes, Inc.","2"

If you are interested in PowerShell automation, take my Udemy course Improve your productivity with PowerShell.

Convert Windows service to Azure Function

In the past I wrote a post how to migrate Windows service to Azure using Azure WebJobs. Another option for migration of Windows service to Azure is to use Azure Functions.


Udemy course: Migrate Windows service to Azure

Windows service I want to migrate to Azure acts as runtime for execution of scheduled jobs using Timer, which run every 60 seconds to execute scheduled jobs. JobSchedulerService execute JobExecutor.Execute() method every 60 seconds as visible in source code of Windows service:

public partial class JobSchedulerService : ServiceBase
{
    private Timer timer;

    public JobSchedulerService()
    {
        InitializeComponent();
    }

    protected override void OnStart(string[] args)
    {
        timer = new Timer();
        timer.Elapsed += OnTimer;
        timer.Interval = 60 * 1000;
        timer.Start();
    }

    protected override void OnStop()
    {
        timer.Stop();
    }

    private void OnTimer(object sender, ElapsedEventArgs e)
    {
        JobExecutor.Execute();
    }
}

To convert Windows service to Azure Function, add new project to Visual Studio solution:

Visual Studio - Add a new project

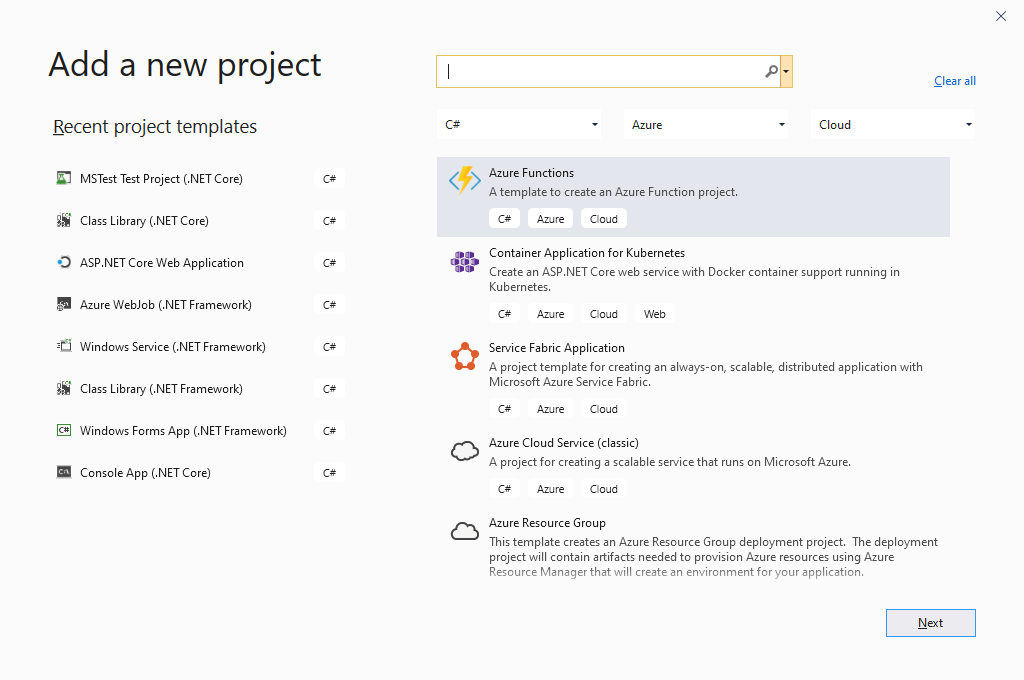
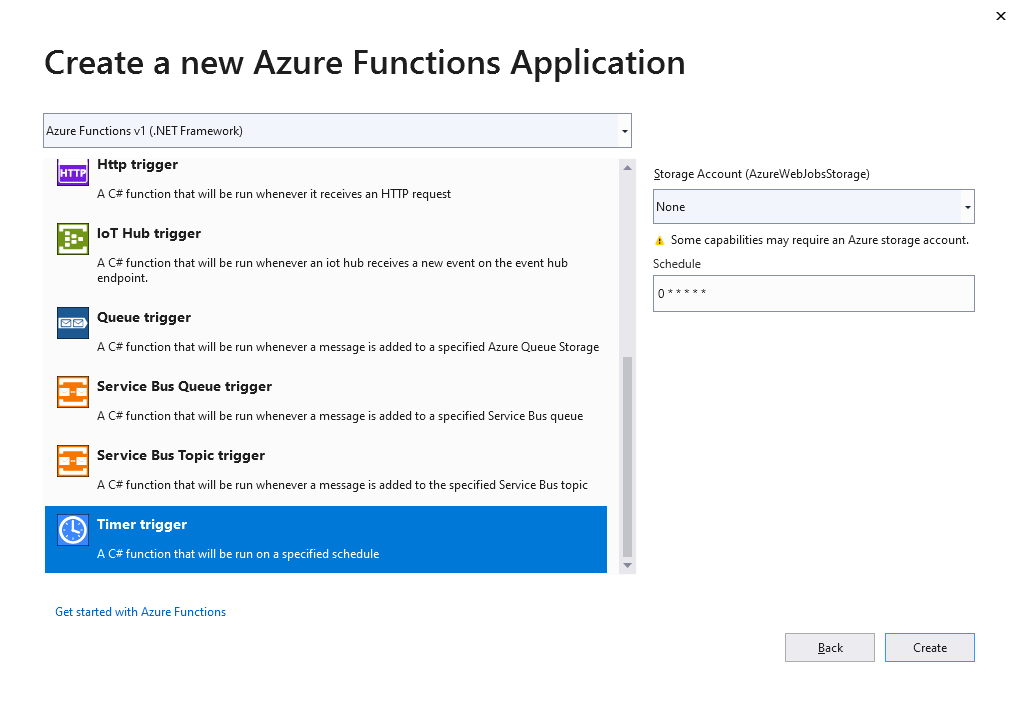
Select Azure Functions v1 (.NET Framework) as version, because Windows service is build on .NET Framework 4.7.2. Then select Timer trigger, none Storage Account and enter schedule “0 * * * * *”, which is CRON expression for triggering run every 60 seconds.

Visual Studio - Create a new Azure Functions Application

Code changes in function are simple, only call of JobExecutor.Execute() is added into Run method:

public static class JobSchedulerFunction
{
    [FunctionName("JobSchedulerFunction")]
    public static void Run([TimerTrigger("0 * * * * *")]TimerInfo timer, TraceWriter log)
    {
        JobExecutor.Execute();
    }
}

Next step is to create Azure resources to run Azure Function using Azure CLI:

# Before running this script check if Application Insights extension is installed:
# az extension show --name application-insights
# If not installed, install it by:
# az extension add --name application-insights

az group create --name WinServiceToAzureTest --location westeurope

az storage account create --resource-group WinServiceToAzureTest --name winservicetoazuretest --sku Standard_LRS --kind StorageV2
az monitor app-insights component create --resource-group WinServiceToAzureTest --app WinServiceToAzureTest --location westeurope --kind web

az functionapp create --name WinServiceToAzureTest --resource-group WinServiceToAzureTest --storage-account winservicetoazuretest --app-insights WinServiceToAzureTest --consumption-plan-location westeurope --runtime dotnet
az functionapp config appsettings set --name WinServiceToAzureTest --resource-group WinServiceToAzureTest --settings "FUNCTIONS_EXTENSION_VERSION=~1"

After finishing of run is created new Resource Group, Storage Account, Application Insights and finally Function App. Important part is here to set Azure Functions runtime to version 1 using application setting FUNCTIONS_EXTENSION_VERSION.
Deployment of Azure Functions to Azure can be done by combination of PowerShell and Azure CLI:

Compress-Archive -Path .\bin\Release\net472\* -DestinationPath WindowsServiceToAzure.Job.Function.zip
az functionapp deployment source config-zip --resource-group WinServiceToAzureTest --name WinServiceToAzureTest --src .\WindowsServiceToAzure.Job.Function.zip

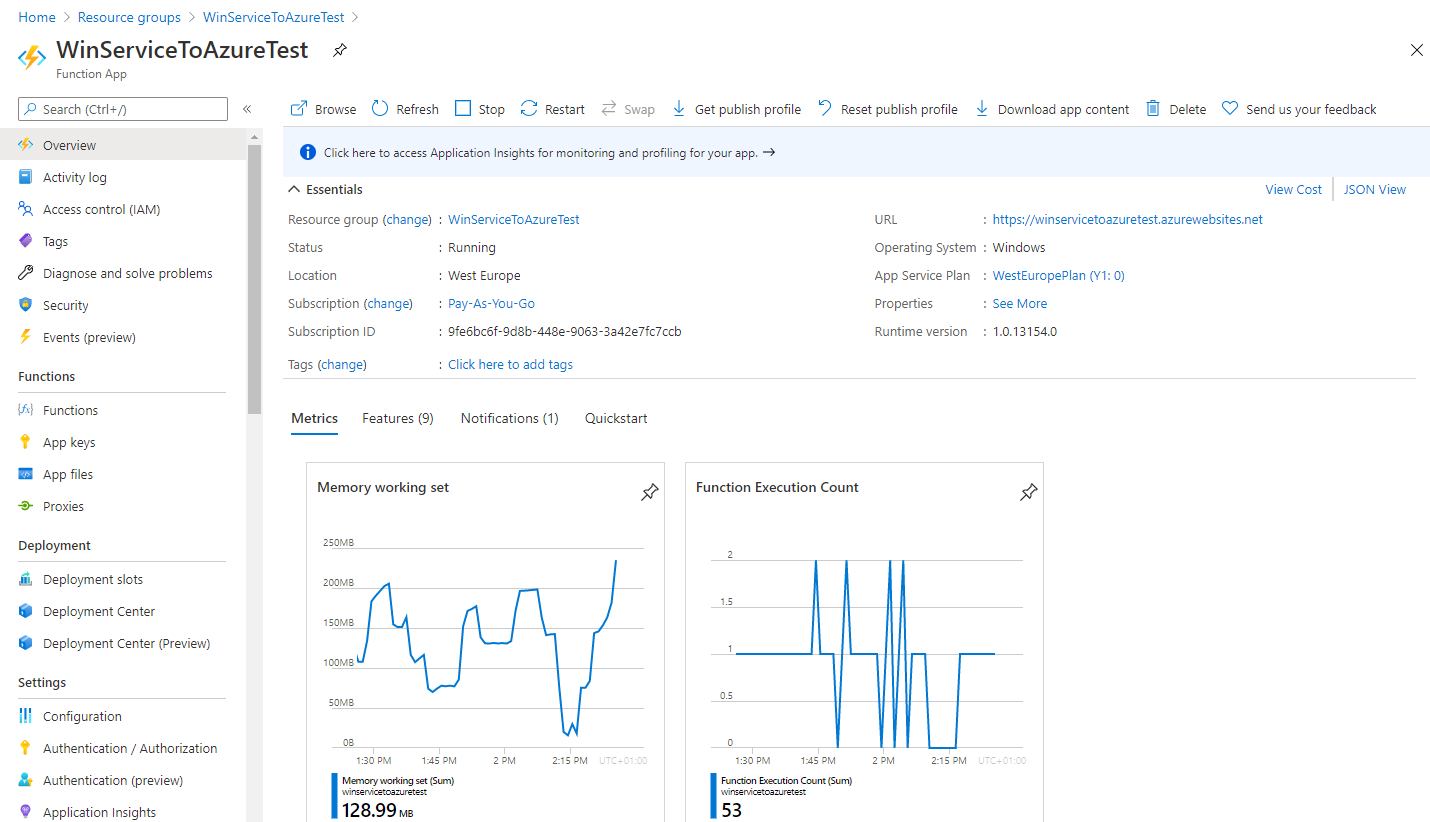
After deployment is Azure Function running, which is visible on Function App dashboard:

Azure Portal - Function App

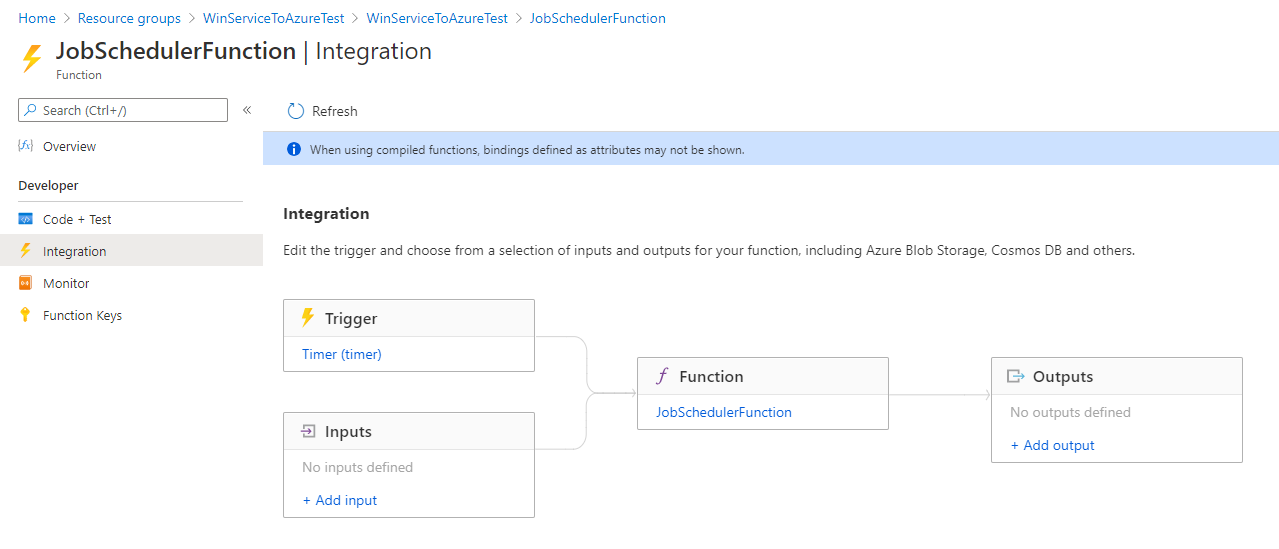
Azure Function integration diagram displays function input and outputs:

Azure Portal - Function Integration

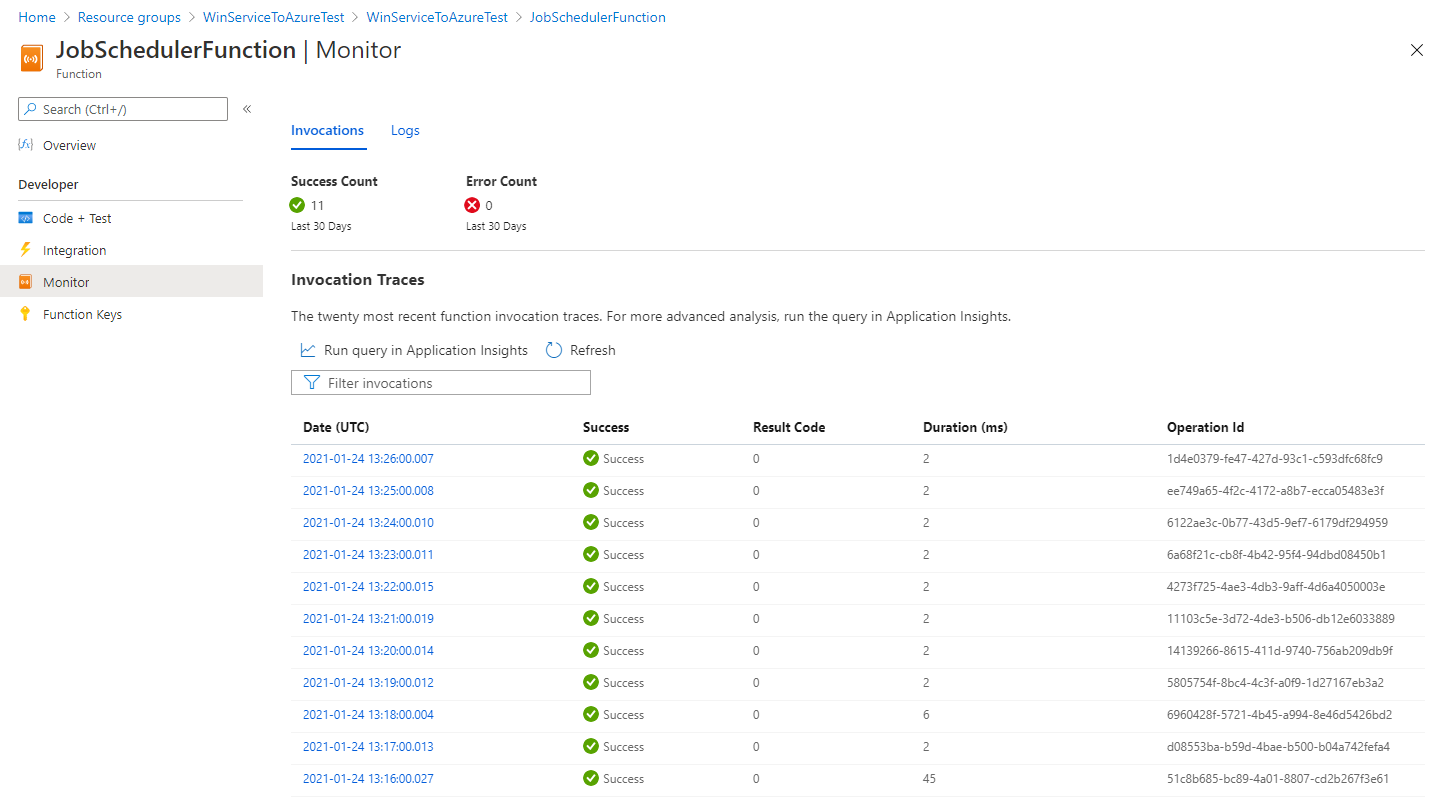
Detailed logs about the activity of Azure Function is visible in monitor:

Azure Portal - Function Monitor

Cleanup of used Azure resources can be done using Azure CLI:

az group delete --name WinServiceToAzureTest --yes -y

If you are interested in Windows services and how to migrate them to Azure, take my Udemy course Migrate Windows service to Azure.

Create infrastructure for Azure WebJob using PowerShell

Azure infrastructure for Azure WebJob consists from following resources:

  • App Service Plan – scalable cluster of web servers
  • Web App – hosting environment running on App Service plan
  • Storage Account – stores data about Azure WebJob execution
  • Application Insights – monitoring

All there resources can be created using following PowerShell script:

param
(
    $resourceGroup = $(throw "Resource group is required"),
    $location = "westeurope"
)

$resourceGroupLower = $resourceGroup.ToLower()

New-AzResourceGroup -Name $resourceGroup -Location $location -ErrorAction Stop

New-AzAppServicePlan -Name $resourceGroup -ResourceGroupName $resourceGroup `
    -Location $location -Tier Basic -WorkerSize Small -NumberofWorkers 1 -ErrorAction Stop

New-AzWebApp -Name $resourceGroupLower -ResourceGroupName $resourceGroup `
    -Location $location -AppServicePlan $resourceGroup -ErrorAction Stop

New-AzStorageAccount -Name $resourceGroupLower -ResourceGroupName $resourceGroup `
    -Location $location -SkuName Standard_LRS -Kind StorageV2 -ErrorAction Stop

New-AzApplicationInsights -Name $resourceGroup -ResourceGroupName $resourceGroup `
    -Location $location -Kind web -ErrorAction Stop

PowerShell script has following parameters:

  • $resourceGroup – resource group name
  • $location – location name with West Europe as default value


Udemy course: Improve your productivity with PowerShell

Manage Windows service using PowerShell

Windows service can be managed using few PowerShell cmdlets.


Udemy course: Migrate Windows service to Azure

Install Windows service into operating system:

New-Service -BinaryPathName .\PathTo\MyWinService.exe -Name MyWinService `
            -DisplayName "My Windows Service" -StartupType Automatic

List installed Windows services using wildcard:

Get-Service *my*

Get Windows service by name:

Get-Service MyWinService

Start Windows service:

Start-Service MyWinService

or:

Get-Service MyWinService | Start-Service

Run Service Management Console to check in UI whether Windows service is installed and running:

services.msc

Stop Windows service:

Stop-Service MyWinService

or:

Get-Service MyWinService | Stop-Service

Uninstall Windows service from operating system in PowerShell 5.0 or previous:

(Get-WmiObject -Class Win32_Service -Filter "Name='MyWinService'").Delete()

Uninstall Windows service from operating system in PowerShell 6.0 or later:

Remove-Service MyWinService

If you are interested in Windows services and how to migrate them to Azure, take my Udemy course Migrate Windows service to Azure.

Deploy Azure WebJob using PowerShell

There are many posts on thema of Azure WebJob deployment using PowerShell. But I try to find the most simple solution possible and it is using the combination of PowerShell and Azure CLI.


Udemy course: Migrate Windows service to Azure

Following PowerShell script deploys Azure WebJob:

param
(
    [string] $buildOutput = $(throw "Directory with build output is required"),
    [string] $resourceGroupName = $(throw "Resource group name is required"),
    [string] $webAppName = $(throw "Web app name is required"),
    [string] $webJobName = $(throw "Web job name is required"),
    [string] $webJobType = "triggered"
)

$currentDir = (Get-Item .).FullName
$tempDir = "$currentDir\Temp"
$webJobDir = "$tempDir\App_Data\jobs\$webJobType\$webJobName"

New-Item $webJobDir -ItemType Directory
Copy-Item "$buildOutput\*" -Destination $webJobDir -Recurse
Compress-Archive -Path "$tempDir\*" -DestinationPath ".\$webJobName.zip"
Remove-Item $tempDir -Recurse -Force

az webapp deployment source config-zip -g $resourceGroupName -n $webAppName --src "$webJobName.zip"

PowerShell script has following parameters:

  • $buildOutput – Azure WebJob build output, in my case it is bin\Release\net472 folder
  • $resourceGroupName – Azure resource group name
  • $webAppName – Azure Web App name running on Azure App Service
  • $webJobName – Azure WebJob name
  • $webJobType – Azure WebJob type (triggered/continuous)

PowerShell creates temp directory and copy build output to the temp directory. The key part here is to use defined directory structure App_Data\jobs\$webJobType\$webJobName to deploy Azure WebJob to valid directory in Azure WebApp. Then create ZIP archive and remove temp directory. Then deploys Azure WebJob using Azure CLI command az webapp deployment to Azure.

If you are interested in Azure WebJobs and how to use them for Windows service migration to Azure, take my Udemy course Migrate Windows service to Azure where you learn more about Azure WebJob implementation, deployment, configuration and monitoring.