Create infrastructure for Azure WebJob using PowerShell

Azure infrastructure for Azure WebJob consists from following resources:

  • App Service Plan – scalable cluster of web servers
  • Web App – hosting environment running on App Service plan
  • Storage Account – stores data about Azure WebJob execution
  • Application Insights – monitoring

All there resources can be created using following PowerShell script:

param
(
    $resourceGroup = $(throw "Resource group is required"),
    $location = "westeurope"
)

$resourceGroupLower = $resourceGroup.ToLower()

New-AzResourceGroup -Name $resourceGroup -Location $location -ErrorAction Stop

New-AzAppServicePlan -Name $resourceGroup -ResourceGroupName $resourceGroup `
    -Location $location -Tier Basic -WorkerSize Small -NumberofWorkers 1 -ErrorAction Stop

New-AzWebApp -Name $resourceGroupLower -ResourceGroupName $resourceGroup `
    -Location $location -AppServicePlan $resourceGroup -ErrorAction Stop

New-AzStorageAccount -Name $resourceGroupLower -ResourceGroupName $resourceGroup `
    -Location $location -SkuName Standard_LRS -Kind StorageV2 -ErrorAction Stop

New-AzApplicationInsights -Name $resourceGroup -ResourceGroupName $resourceGroup `
    -Location $location -Kind web -ErrorAction Stop

PowerShell script has following parameters:

  • $resourceGroup – resource group name
  • $location – location name with West Europe as default value


Udemy course: Improve your productivity with PowerShell

Deploy Azure WebJob using PowerShell

There are many posts on thema of Azure WebJob deployment using PowerShell. But I try to find the most simple solution possible and it is using the combination of PowerShell and Azure CLI.


Udemy course: Migrate Windows service to Azure

Following PowerShell script deploys Azure WebJob:

param
(
    [string] $buildOutput = $(throw "Directory with build output is required"),
    [string] $resourceGroupName = $(throw "Resource group name is required"),
    [string] $webAppName = $(throw "Web app name is required"),
    [string] $webJobName = $(throw "Web job name is required"),
    [string] $webJobType = "triggered"
)

$currentDir = (Get-Item .).FullName
$tempDir = "$currentDir\Temp"
$webJobDir = "$tempDir\App_Data\jobs\$webJobType\$webJobName"

New-Item $webJobDir -ItemType Directory
Copy-Item "$buildOutput\*" -Destination $webJobDir -Recurse
Compress-Archive -Path "$tempDir\*" -DestinationPath ".\$webJobName.zip"
Remove-Item $tempDir -Recurse -Force

az webapp deployment source config-zip -g $resourceGroupName -n $webAppName --src "$webJobName.zip"

PowerShell script has following parameters:

  • $buildOutput – Azure WebJob build output, in my case it is bin\Release\net472 folder
  • $resourceGroupName – Azure resource group name
  • $webAppName – Azure Web App name running on Azure App Service
  • $webJobName – Azure WebJob name
  • $webJobType – Azure WebJob type (triggered/continuous)

PowerShell creates temp directory and copy build output to the temp directory. The key part here is to use defined directory structure App_Data\jobs\$webJobType\$webJobName to deploy Azure WebJob to valid directory in Azure WebApp. Then create ZIP archive and remove temp directory. Then deploys Azure WebJob using Azure CLI command az webapp deployment to Azure.

If you are interested in Azure WebJobs and how to use them for Windows service migration to Azure, take my Udemy course Migrate Windows service to Azure where you learn more about Azure WebJob implementation, deployment, configuration and monitoring.

Create Azure SQL Database using PowerShell cmdlets

Azure SQL Database can be created using UI in Azure Portal, using PowerShell cmdlets or by using Azure Resource Manager template written in JSON. Following PowerShell script creates Azure SQL Database using PowerShell cmdlets:

Udemy course: Improve your productivity with PowerShell

param
(
    $resourceGroup = $(throw "Resource group is required"),
    $location = $(throw "Location is required"),
    $server = $(throw "Server is required"),
    $database = $(throw "Database is required"),
    $adminLogin = $(throw "Admin login is required"),
    $adminPassword = $(throw "Admin password is required"),
    $ipAddress = $(throw "IP address is required")
)

New-AzureRmResourceGroup -Name $resourceGroup -Location $location

$securePassword = ConvertTo-SecureString -String $adminPassword -AsPlainText -Force
$credentials = New-Object -TypeName System.Management.Automation.PSCredential -ArgumentList $adminLogin, $securePassword

New-AzureRmSqlServer -ResourceGroupName $resourceGroup `
    -ServerName $server `
    -Location $location `
    -SqlAdministratorCredentials $credentials

New-AzureRmSqlServerFirewallRule -ResourceGroupName $resourceGroup `
    -ServerName $server `
    -FirewallRuleName "Default" `
    -StartIpAddress $ipAddress `
    -EndIpAddress $ipAddress

New-AzureRmSqlDatabase -ResourceGroupName $resourceGroup `
    -ServerName $server `
    -DatabaseName $database `
    -RequestedServiceObjectiveName "S0"

$result = Invoke-Sqlcmd -ServerInstance "$server.database.windows.net" `
    -Database $database `
    -Username $adminLogin `
    -Password $adminPassword `
    -Query "SELECT @@VERSION AS Version"

$result.Version

PowerShell script creates new resource group, SQL server, configures firewall and than create empty database. At the end new database is queried by simple T-SQL command.

If you are interested in PowerShell automation, take my Udemy course Improve your productivity with PowerShell.

Speed up your website with Azure CDN

Your existing website performance can be dramatically improved by serving static content (JavaScript, CSS, images) from CDN. Azure CDN provides very interesting scenario when you don’t need to copy any files on CDN, but you configure CDN endpoint to load resources from your website. It means that when you first time request some content from Azure CDN and it’s not cached on CDN, it is loaded from website and next requests are served only by CDN. This approach has benefits that you don’t need to copy anything on CDN and you don’t have to modify your deployment pipeline.

In this step by step tutorial is showed how easy is to integrate Azure CDN with existing website. As a sample web app is used ASP.NET MVC 5.2.3 project template from Visual Studio 2015. BundleConfig from project template has following code:

 
public class BundleConfig
{
    public static void RegisterBundles(BundleCollection bundles)
    {
        bundles.Add(new ScriptBundle("~/bundles/jquery").Include(
                  "~/Scripts/jquery-{version}.js"));

        bundles.Add(new ScriptBundle("~/bundles/jqueryval").Include(
                  "~/Scripts/jquery.validate*"));

        bundles.Add(new ScriptBundle("~/bundles/modernizr").Include(
                  "~/Scripts/modernizr-*"));

        bundles.Add(new ScriptBundle("~/bundles/bootstrap").Include(
                  "~/Scripts/bootstrap.js",
                  "~/Scripts/respond.js"));

        bundles.Add(new StyleBundle("~/Content/css").Include(
                  "~/Content/bootstrap.css",
                  "~/Content/site.css"));
    }
}

In this configuration generated HTML code has following link and script tags, it means that CSS and JavaScript is loaded from website:

<!DOCTYPE html>
<html>
<head>
    <meta charset="utf-8" />
    <meta name="viewport" content="width=device-width, initial-scale=1.0">
    <title>Home Page - My ASP.NET Application</title>
    <link href="/Content/css?v=MDbdFKJHBa_ctS5x4He1bMV0_RjRq8jpcIAvPpKiN6U1" rel="stylesheet"/>
    <script src="/bundles/modernizr?v=wBEWDufH_8Md-Pbioxomt90vm6tJN2Pyy9u9zHtWsPo1"></script>
</head>
<body>
    <!-- Page content -->
    <script src="/bundles/jquery?v=FVs3ACwOLIVInrAl5sdzR2jrCDmVOWFbZMY6g6Q0ulE1"></script>
    <script src="/bundles/bootstrap?v=2Fz3B0iizV2NnnamQFrx-NbYJNTFeBJ2GM05SilbtQU1"></script>
</body>
</html>

Configuration of Azure infrastructure consists of two steps, creating Azure CDN profile and endpoint. To create Azure CDN profile in Azure Portal select New > Web + Mobile > CDN:
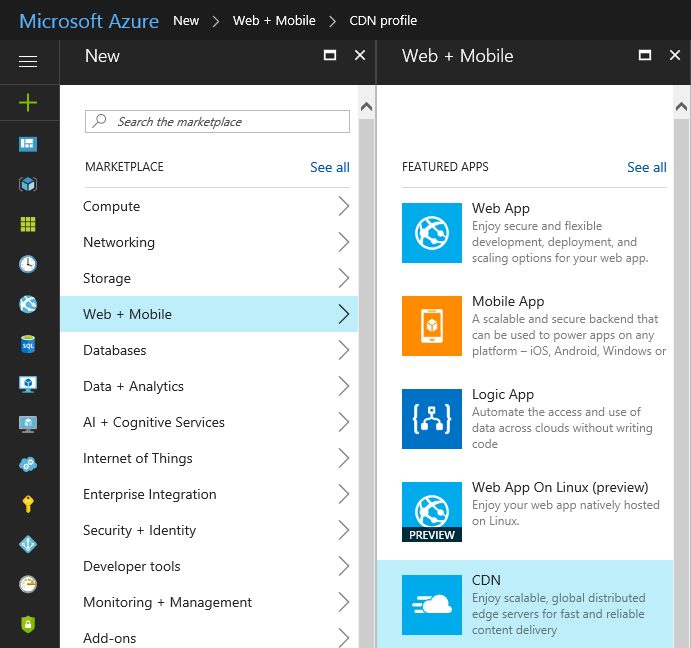
Azure CDN

Specify Azure CDN profile attributes (name, subscription, resource group, resource group location):
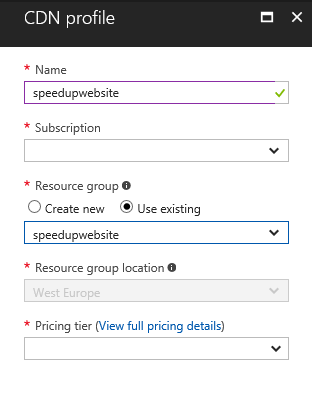
Azure CDN

The last step at Azure CDN profile creation is selection of pricing tier according to your requirements:
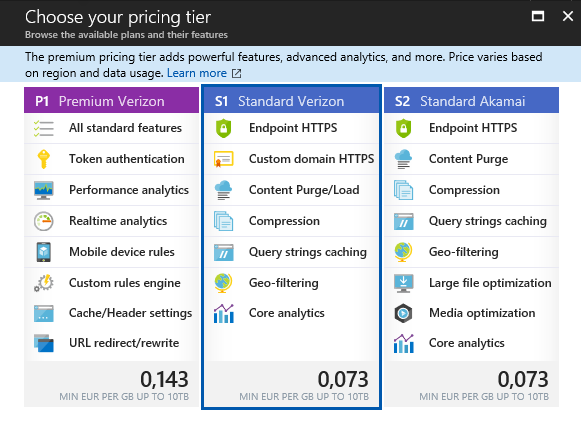
Azure CDN

After creating Azure CDN profile the next step is creation of endpoint. In add endpoint dialog specify name, origin type and origin hostname. In our case, the selected origin type was Web App because sample web application is hosted on Azure. If your web app is not hosted on Azure select custom origin at origin type field and type your web app hostname.
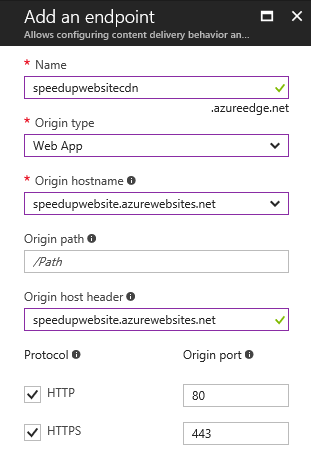
Azure CDN

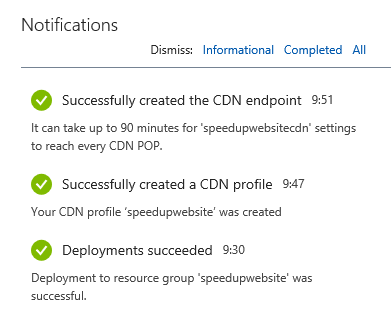
When CDN endpoint is created, you have to wait up to 90 minutes when endpoint settings reach every CDN POP locations.
Azure CDN

Azure CDN infrastructure is configured after this steps. To integrate Azure CDN with ASP.NET MVC web app only small changes are required. As the first step add custom app settings to web.config. App settings key names are CdnUrl and CdnEnabled:

<?xml version="1.0" encoding="utf-8"?>
<configuration>
    <appSettings>
        <add key="CdnUrl" value="http://speedupwebsitecdn.azureedge.net" />
        <add key="CdnEnabled" value="true" />
    </appSettings>
    <!-- Other configuration -->
</configuration>

Then modify BundleConfig to specify virtual path and also CDN path for resources:

public class BundleConfig
{
    public static void RegisterBundles(BundleCollection bundles)
    {
        bundles.UseCdn = Convert.ToBoolean(ConfigurationManager.AppSettings["CdnEnabled"]);

        bundles.Add(new ScriptBundle(CreateVirtualPath("/bundles/jquery"), CreateCdnPath("/bundles/jquery")).Include(
                  "~/Scripts/jquery-{version}.js"));

        bundles.Add(new ScriptBundle(CreateVirtualPath("/bundles/jqueryval"), CreateCdnPath("/bundles/jqueryval")).Include(
                  "~/Scripts/jquery.validate*"));

        bundles.Add(new ScriptBundle(CreateVirtualPath("/bundles/modernizr"), CreateCdnPath("/bundles/modernizr")).Include(
                  "~/Scripts/modernizr-*"));

        bundles.Add(new ScriptBundle(CreateVirtualPath("/bundles/bootstrap"), CreateCdnPath("/bundles/bootstrap")).Include(
                  "~/Scripts/bootstrap.js",
                  "~/Scripts/respond.js"));

        bundles.Add(new StyleBundle(CreateVirtualPath("/Content/css"), CreateCdnPath("/Content/css")).Include(
                  "~/Content/bootstrap.css",
                  "~/Content/site.css"));
    }

    private static string CreateVirtualPath(string path)
    {
        return $"~{path}";
    }

    private static string CreateCdnPath(string path)
    {
        string cdnUrl = ConfigurationManager.AppSettings["CdnUrl"];
        return $"{cdnUrl}{path}";
    }
}

The methods CreateVirtualPath and CreateCdnPath uses string interpolation to format strings. This feature comes with C# 6. If you are not familiar with this syntax, you can take my Udemy course What is new in C# 6.

In this configuration after deployment, generated HTML code has following link and script tags, it means that CSS and JavaScript is loaded from Azure CDN endpoint:

<!DOCTYPE html>
<html>
<head>
    <meta charset="utf-8" />
    <meta name="viewport" content="width=device-width, initial-scale=1.0">
    <title>Home Page - My ASP.NET Application</title>
    <link href="http://speedupwebsitecdn.azureedge.net/Content/css" rel="stylesheet"/>
    <script src="http://speedupwebsitecdn.azureedge.net/bundles/modernizr"></script>
</head>
<body>
    <!-- Page content -->
    <script src="http://speedupwebsitecdn.azureedge.net/bundles/jquery"></script>
    <script src="http://speedupwebsitecdn.azureedge.net/bundles/bootstrap"></script>
</body>
</html>

To serve images and other content from Azure CDN, simple URL helper is created:

public static class UrlHelperExtensions
{
    public static string Cdn(this UrlHelper urlHelper, string url)
    {
        if (String.IsNullOrEmpty(url))
        {
            throw new ArgumentNullException(nameof(url));
        }

        string cdnUrl = ConfigurationManager.AppSettings["CdnUrl"];
        bool cdnEnabled = Convert.ToBoolean(ConfigurationManager.AppSettings["CdnEnabled"]);

        string nonVirtualUrl = url.StartsWith("~") ? url.Substring(1) : url;

        if (cdnEnabled)
        {
            return cdnUrl + nonVirtualUrl;
        }
        else
        {
            return nonVirtualUrl;
        }
    }
}

This URL helper reads the configuration from web.config and according it create resource URL targeting web app or CDN. Usage of URL helper in Razor view is very simple:

<img src="@Url.Cdn("~/Images/Image1.jpg")" />

If you want to solve versioning and fallback mechanism together with Azure CDN, please refer to following article in official Azure CDN documentation.

Azure WebJobs or how to migrate Windows Service to Azure

Some time ago I solved problem how to migrate solution consisting from ASP.NET MVC website, Microsoft SQL Server DB and Windows Service to Microsoft Azure.


Udemy course: Migrate Windows service to Azure

Migration of website and DB is straightforward, but migration of Windows Service can be realized different ways. Purpose of Windows Service was act as runtime for execution of scheduled jobs using Timer, which run every 60 seconds to execute scheduled jobs as can be seen in source code:

public partial class JobSchedulerService : System.ServiceProcess.ServiceBase
{
    private Timer timer;

    protected override void OnStart(string[] args)
    {
        timer = new Timer();
        timer.Elapsed += OnTimer;
        timer.Interval = 60 * 1000;  // 60 seconds
        timer.AutoReset = false;
        timer.Start();
    }

    protected override void OnStop()
    {
        timer.Stop();
    }

    private void OnTimer(object sender, ElapsedEventArgs e)
    {
        JobExecutor.ExecuteScheduledJobs();
    }
}

JobSchedulerService execute JobExecutor.ExecuteScheduledJobs() method every 60 seconds. I found 3 options how to migrate this component into Azure infrastructure:

1. Azure Virtual Machine

Pros

  • No code changes in Windows Service required
  • The same deployment method as at on premise solution

Cons

  • Price of Azure VM

2. Azure Cloud Service

Pros

  • Scalability

Cons

  • Price of Azure Cloud Service
  • Complex code changes required

3. Azure WebJob

Pros

  • No price of Azure WebJob because it is part od Azure App Service

Cons

  • Minimal code changes required

Due to cost I decided for Azure WebJob. Transformation of Windows Service to Azure WebJob is simple. I created Azure WebJob project with the following implementation of Program and Function classes:

public class Program
{
    static void Main()
    {
        var host = new JobHost();
        host.Call(typeof(Functions).GetMethod("ExecuteJobs"));
    } 
}

public class Functions
{
    [NoAutomaticTrigger]
    public static void ExecuteJobs()
    {
        JobExecutor.ExecuteScheduledJobs();
    } 
}

Then I created ZIP package from build output and uploaded it to Azure Portal with WebJob type Triggered and CRON schedule “0 * * * * *” to execute every 60 seconds.

If you are interested about more detailed step by step instructions, take my Udemy course Migrate Windows service to Azure. This course describes all aspects of migration Windows service to Azure and help you to find and implement cost effective solution, which help you to save the money in future.