Speed up your website with Azure CDN

Your existing website performance can be dramatically improved by serving static content (JavaScript, CSS, images) from CDN. Azure CDN provides very interesting scenario when you don’t need to copy any files on CDN, but you configure CDN endpoint to load resources from your website. It means that when you first time request some content from Azure CDN and it’s not cached on CDN, it is loaded from website and next requests are served only by CDN. This approach has benefits that you don’t need to copy anything on CDN and you don’t have to modify your deployment pipeline.

In this step by step tutorial is showed how easy is to integrate Azure CDN with existing website. As a sample web app is used ASP.NET MVC 5.2.3 project template from Visual Studio 2015. BundleConfig from project template has following code:

 
public class BundleConfig
{
    public static void RegisterBundles(BundleCollection bundles)
    {
        bundles.Add(new ScriptBundle("~/bundles/jquery").Include(
                  "~/Scripts/jquery-{version}.js"));

        bundles.Add(new ScriptBundle("~/bundles/jqueryval").Include(
                  "~/Scripts/jquery.validate*"));

        bundles.Add(new ScriptBundle("~/bundles/modernizr").Include(
                  "~/Scripts/modernizr-*"));

        bundles.Add(new ScriptBundle("~/bundles/bootstrap").Include(
                  "~/Scripts/bootstrap.js",
                  "~/Scripts/respond.js"));

        bundles.Add(new StyleBundle("~/Content/css").Include(
                  "~/Content/bootstrap.css",
                  "~/Content/site.css"));
    }
}

In this configuration generated HTML code has following link and script tags, it means that CSS and JavaScript is loaded from website:

<!DOCTYPE html>
<html>
<head>
    <meta charset="utf-8" />
    <meta name="viewport" content="width=device-width, initial-scale=1.0">
    <title>Home Page - My ASP.NET Application</title>
    <link href="/Content/css?v=MDbdFKJHBa_ctS5x4He1bMV0_RjRq8jpcIAvPpKiN6U1" rel="stylesheet"/>
    <script src="/bundles/modernizr?v=wBEWDufH_8Md-Pbioxomt90vm6tJN2Pyy9u9zHtWsPo1"></script>
</head>
<body>
    <!-- Page content -->
    <script src="/bundles/jquery?v=FVs3ACwOLIVInrAl5sdzR2jrCDmVOWFbZMY6g6Q0ulE1"></script>
    <script src="/bundles/bootstrap?v=2Fz3B0iizV2NnnamQFrx-NbYJNTFeBJ2GM05SilbtQU1"></script>
</body>
</html>

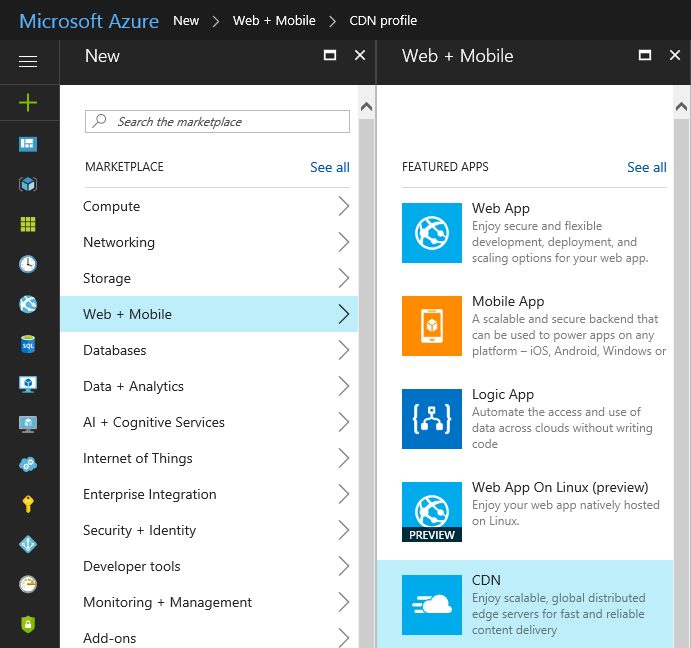
Configuration of Azure infrastructure consists of two steps, creating Azure CDN profile and endpoint. To create Azure CDN profile in Azure Portal select New > Web + Mobile > CDN:

Azure CDN

Specify Azure CDN profile attributes (name, subscription, resource group, resource group location):

Azure CDN

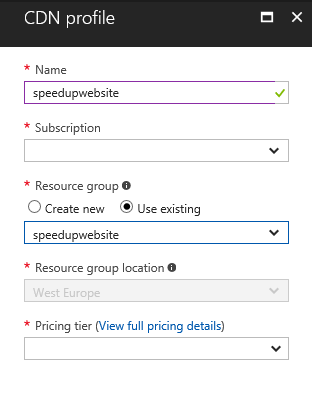
The last step at Azure CDN profile creation is selection of pricing tier according to your requirements:

Azure CDN

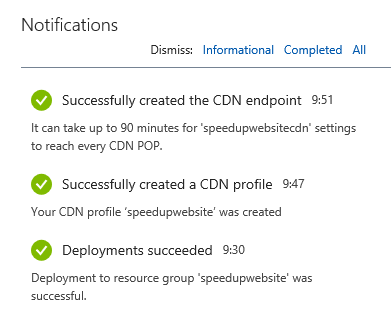
After creating Azure CDN profile the next step is creation of endpoint. In add endpoint dialog specify name, origin type and origin hostname. In our case, the selected origin type was Web App because sample web application is hosted on Azure. If your web app is not hosted on Azure select custom origin at origin type field and type your web app hostname.

Azure CDN

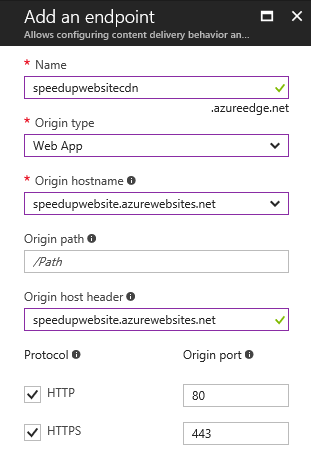
When CDN endpoint is created, you have to wait up to 90 minutes when endpoint settings reach every CDN POP locations.

Azure CDN

Azure CDN infrastructure is configured after this steps. To integrate Azure CDN with ASP.NET MVC web app only small changes are required. As the first step add custom app settings to web.config. App settings key names are CdnUrl and CdnEnabled:

<?xml version="1.0" encoding="utf-8"?>
<configuration>
    <appSettings>
        <add key="CdnUrl" value="http://speedupwebsitecdn.azureedge.net" />
        <add key="CdnEnabled" value="true" />
    </appSettings>
    <!-- Other configuration -->
</configuration>

Then modify BundleConfig to specify virtual path and also CDN path for resources:

public class BundleConfig
{
    public static void RegisterBundles(BundleCollection bundles)
    {
        bundles.UseCdn = Convert.ToBoolean(ConfigurationManager.AppSettings["CdnEnabled"]);

        bundles.Add(new ScriptBundle(CreateVirtualPath("/bundles/jquery"), CreateCdnPath("/bundles/jquery")).Include(
                  "~/Scripts/jquery-{version}.js"));

        bundles.Add(new ScriptBundle(CreateVirtualPath("/bundles/jqueryval"), CreateCdnPath("/bundles/jqueryval")).Include(
                  "~/Scripts/jquery.validate*"));

        bundles.Add(new ScriptBundle(CreateVirtualPath("/bundles/modernizr"), CreateCdnPath("/bundles/modernizr")).Include(
                  "~/Scripts/modernizr-*"));

        bundles.Add(new ScriptBundle(CreateVirtualPath("/bundles/bootstrap"), CreateCdnPath("/bundles/bootstrap")).Include(
                  "~/Scripts/bootstrap.js",
                  "~/Scripts/respond.js"));

        bundles.Add(new StyleBundle(CreateVirtualPath("/Content/css"), CreateCdnPath("/Content/css")).Include(
                  "~/Content/bootstrap.css",
                  "~/Content/site.css"));
    }

    private static string CreateVirtualPath(string path)
    {
        return $"~{path}";
    }

    private static string CreateCdnPath(string path)
    {
        string cdnUrl = ConfigurationManager.AppSettings["CdnUrl"];
        return $"{cdnUrl}{path}";
    }
}

The methods CreateVirtualPath and CreateCdnPath uses string interpolation to format strings. This feature comes with C# 6. If you are not familiar with this syntax, you can take my Udemy course What is new in C# 6.

In this configuration after deployment, generated HTML code has following link and script tags, it means that CSS and JavaScript is loaded from Azure CDN endpoint:

<!DOCTYPE html>
<html>
<head>
    <meta charset="utf-8" />
    <meta name="viewport" content="width=device-width, initial-scale=1.0">
    <title>Home Page - My ASP.NET Application</title>
    <link href="http://speedupwebsitecdn.azureedge.net/Content/css" rel="stylesheet"/>
    <script src="http://speedupwebsitecdn.azureedge.net/bundles/modernizr"></script>
</head>
<body>
    <!-- Page content -->
    <script src="http://speedupwebsitecdn.azureedge.net/bundles/jquery"></script>
    <script src="http://speedupwebsitecdn.azureedge.net/bundles/bootstrap"></script>
</body>
</html>

To serve images and other content from Azure CDN, simple URL helper is created:

public static class UrlHelperExtensions
{
    public static string Cdn(this UrlHelper urlHelper, string url)
    {
        if (String.IsNullOrEmpty(url))
        {
            throw new ArgumentNullException(nameof(url));
        }

        string cdnUrl = ConfigurationManager.AppSettings["CdnUrl"];
        bool cdnEnabled = Convert.ToBoolean(ConfigurationManager.AppSettings["CdnEnabled"]);

        string nonVirtualUrl = url.StartsWith("~") ? url.Substring(1) : url;

        if (cdnEnabled)
        {
            return cdnUrl + nonVirtualUrl;
        }
        else
        {
            return nonVirtualUrl;
        }
    }
}

This URL helper reads the configuration from web.config and according it create resource URL targeting web app or CDN. Usage of URL helper in Razor view is very simple:

<img src="@Url.Cdn("~/Images/Image1.jpg")" />

If you want to solve versioning and fallback mechanism together with Azure CDN, please refer to following article in official Azure CDN documentation.

Configure Microsoft SQL Server using PowerShell

Some time ago I created automatized installation of SharePoint. One of this set of scripts was script for configuration of clean MSSQL installation. Script uses SQL Server Management Objects (SMO) as API for MSSQL manangement:

# Load assemblies
[System.Reflection.Assembly]::LoadWithPartialName("Microsoft.SqlServer.Smo") | Out-Null
[System.Reflection.Assembly]::LoadWithPartialName("Microsoft.SqlServer.SqlEnum") | Out-Null
[System.Reflection.Assembly]::LoadWithPartialName("Microsoft.SqlServer.ConnectionInfo") | Out-Null

$connection = New-Object Microsoft.SqlServer.Management.Common.ServerConnection
$server = New-Object Microsoft.SqlServer.Management.Smo.Server $connection

# Create login for SP2016\Administrator
$login = New-Object Microsoft.SqlServer.Management.Smo.Login $server, "SP2016\Administrator"
$login.LoginType = [Microsoft.SqlServer.Management.Smo.LoginType]::WindowsUser
$login.Create()
$login.AddToRole("sysadmin")

# Create login for SP2016\SP_Admin
$login = New-Object Microsoft.SqlServer.Management.Smo.Login $server, "SP2016\SP_Admin"
$login.LoginType = [Microsoft.SqlServer.Management.Smo.LoginType]::WindowsUser
$login.Create()
$login.AddToRole("dbcreator")
$login.AddToRole("securityadmin")

# Set max. server memory
$server.Configuration.MaxServerMemory.ConfigValue = 2048
$server.Configuration.Alter()


Udemy course: Improve your productivity with PowerShell

PowerShell script at the start loads SMO assemblies and connects to the local MSSQL instance. Then creates logins from domain accounts and add it to server roles. At the end the script set maximum memory which can MSSQL allocate for ist operation.

If you are interested in PowerShell automation, take my Udemy course Improve your productivity with PowerShell.

Analyse Redis cache usage with PowerShell

At the load tests I need to analyse communication between web servers and Redis Cache. My target was to have a statistics with most accessed cache keys. To get required stasticts I run MONITOR command to collect data from Redis cache usage to file using redis-cli command:

.\redis-cli.exe -h <redis_host> -a <redis_access_key> monitor > monitor.log


Udemy course: Improve your productivity with PowerShell

Then I run load test to create traffic on web servers. After the load test I stop MONITOR command using CTRL+C. Statistics is created from usage of GET command. Raw monitor.log file is processed by following PowerShell command:

Get-Content .\monitor.log `
 | Select-String " ""GET"" " `
 | ForEach-Object { $_.ToString().Split(@(" ""GET"" "), [System.StringSplitOptions]::None)[1] } `
 | Group-Object `
 | Sort-Object -Property Count -Descending `
 | Format-Table -Property Count,Name

Result of PowerShell command is summary statistics with most accessed cache keys:

Count Name
----- ----
 2570 "OrderService_OrderService_Orders_STATE"
 2570 "OrderService_OrderService_Orders"
  261 "Test_a2/product/detail/1"
  225 "Test_a2/product/detail/1HQNnoneV+n+FCDE"
  211 "Test_a2/product/category/1"
  211 "ProductService_ProductService_Product_1_STATE"
  202 "Test_a2/product/detail/1"
  196 "ProductService_ProductService_Product_1"   

If you are interested in PowerShell automation, take my Udemy course Improve your productivity with PowerShell.

Azure WebJobs or how to migrate Windows Service to Azure

Some time ago I solved problem how to migrate solution consisting from ASP.NET MVC website, Microsoft SQL Server DB and Windows Service to Microsoft Azure.


Udemy course: Migrate Windows service to Azure

Migration of website and DB is straightforward, but migration of Windows Service can be realized different ways. Purpose of Windows Service was act as runtime for execution of scheduled jobs using Timer, which run every 60 seconds to execute scheduled jobs as can be seen in source code:

public partial class JobSchedulerService : System.ServiceProcess.ServiceBase
{
    private Timer timer;

    protected override void OnStart(string[] args)
    {
        timer = new Timer();
        timer.Elapsed += OnTimer;
        timer.Interval = 60 * 1000;  // 60 seconds
        timer.AutoReset = false;
        timer.Start();
    }

    protected override void OnStop()
    {
        timer.Stop();
    }

    private void OnTimer(object sender, ElapsedEventArgs e)
    {
        JobExecutor.ExecuteScheduledJobs();
    }
}

JobSchedulerService execute JobExecutor.ExecuteScheduledJobs() method every 60 seconds. I found 3 options how to migrate this component into Azure infrastructure:

1. Azure Virtual Machine

Pros

  • No code changes in Windows Service required
  • The same deployment method as at on premise solution

Cons

  • Price of Azure VM

2. Azure Cloud Service

Pros

  • Scalability

Cons

  • Price of Azure Cloud Service
  • Complex code changes required

3. Azure WebJob

Pros

  • No price of Azure WebJob because it is part od Azure App Service

Cons

  • Minimal code changes required

Due to cost I decided for Azure WebJob. Transformation of Windows Service to Azure WebJob is simple. I created Azure WebJob project with the following implementation of Program and Function classes:

public class Program
{
    static void Main()
    {
        var host = new JobHost();
        host.Call(typeof(Functions).GetMethod("ExecuteJobs"));
    } 
}

public class Functions
{
    [NoAutomaticTrigger]
    public static void ExecuteJobs()
    {
        JobExecutor.ExecuteScheduledJobs();
    } 
}

Then I created ZIP package from build output and uploaded it to Azure Portal with WebJob type Triggered and CRON schedule “0 * * * * *” to execute every 60 seconds.

If you are interested about more detailed step by step instructions, take my Udemy course Migrate Windows service to Azure. This course describes all aspects of migration Windows service to Azure and help you to find and implement cost effective solution, which help you to save the money in future.

ASP.NET Identity performance tips

At load tests of web application using ASP.NET Identity 2.2.1 I turned on Microsoft SQL Server Query Store to monitor performance of T-SQL queries. Analyzing the results I suggest following tips to improve performance of ASP.NET Identity:

1. Disable checks of schema version

As for exec count, the following query was on the first place:

SELECT COLUMN_NAME FROM INFORMATION_SCHEMA.COLUMNS where TABLE_NAME=@Table

After some search in source code of ASP.NET Identity I found internal IsIdentityV1Schema method in IdentityDbContext class. This method runs mentioned query to check version of schema, whether DB contains ASP.NET Identity 1.0 schema. To avoid this DB roundtrips you have to set parameter throwIfV1Schema to false in constructor of IdentityDbContext class as shown in code:

public class ApplicationDbContext : IdentityDbContext<ApplicationUser>
{
    public ApplicationDbContext()
        : base("DefaultConnection", throwIfV1Schema: false)
    {
    }
}

The interesting on this issue is fact, that this is set when you create web application project from default template in Visual Studio 2015, but I wrote this code manually, so I didn’t consider the importance of this parameter.

2. Avoid usage of T-SQL UPPER function

When selecting user by username the following query is executed:

SELECT TOP (1)
    [Extent1].[Id] AS [Id],
    [Extent1].[Email] AS [Email],
    [Extent1].[EmailConfirmed] AS [EmailConfirmed],
    [Extent1].[PasswordHash] AS [PasswordHash],
    [Extent1].[SecurityStamp] AS [SecurityStamp],
    [Extent1].[PhoneNumber] AS [PhoneNumber],
    [Extent1].[PhoneNumberConfirmed] AS [PhoneNumberConfirmed],
    [Extent1].[TwoFactorEnabled] AS [TwoFactorEnabled],
    [Extent1].[LockoutEndDateUtc] AS [LockoutEndDateUtc],
    [Extent1].[LockoutEnabled] AS [LockoutEnabled],
    [Extent1].[AccessFailedCount] AS [AccessFailedCount],
    [Extent1].[UserName] AS [UserName]
    FROM [dbo].[AspNetUsers] AS [Extent1]
    WHERE ((UPPER([Extent1].[UserName])) = (UPPER(@p__linq__0))) OR ((UPPER([Extent1].[UserName]) IS NULL) AND (UPPER(@p__linq__0) IS NULL))

Query contains UPPER function which disables usage of index created on UserName column. Execution plan for query is:

Query execution plan

Studying default implementation of UserStore class I found that method FindByNameAsync contains LINQ predicate with ToUpper method. This default behaviour can be overriden creating custom UserStore implementation:

public class ApplicationUserStore : UserStore<ApplicationUser>
{
    public ApplicationUserStore(ApplicationDbContext context)
        : base(context)
    {
    }

    public override Task<ApplicationUser> FindByEmailAsync(string email)
    {
        return GetUserAggregateAsync(u => u.Email == email);
    }

    public override Task<ApplicationUser> FindByNameAsync(string userName)
    {
        return GetUserAggregateAsync(u => u.UserName == userName);
    }
}

Than at creating UserManager only use custom UserStore implementation:

public class ApplicationUserManager : UserManager<ApplicationUser>
{
    public ApplicationUserManager(IUserStore<ApplicationUser> store)
        : base(store)
    {
    }

    public static ApplicationUserManager Create(IdentityFactoryOptions<ApplicationUserManager> options, IOwinContext context) 
    {
        var manager = new ApplicationUserManager(new ApplicationUserStore(context.Get<ApplicationDbContext>()));
        // ...
    }
}

After this customization UPPER function is no longer present in query:

SELECT TOP (1)
    [Extent1].[Id] AS [Id],
    [Extent1].[Email] AS [Email],
    [Extent1].[EmailConfirmed] AS [EmailConfirmed],
    [Extent1].[PasswordHash] AS [PasswordHash],
    [Extent1].[SecurityStamp] AS [SecurityStamp],
    [Extent1].[PhoneNumber] AS [PhoneNumber],
    [Extent1].[PhoneNumberConfirmed] AS [PhoneNumberConfirmed],
    [Extent1].[TwoFactorEnabled] AS [TwoFactorEnabled],
    [Extent1].[LockoutEndDateUtc] AS [LockoutEndDateUtc],
    [Extent1].[LockoutEnabled] AS [LockoutEnabled],
    [Extent1].[AccessFailedCount] AS [AccessFailedCount],
    [Extent1].[UserName] AS [UserName]
    FROM [dbo].[AspNetUsers] AS [Extent1]
    WHERE [Extent1].[UserName] = @p__linq__0

Execution plan for query is now:

Query execution plan

This solution assumes that DB uses case insensitive collation.

3. Index Email column

In my web application there was also many scenarios where users were queried by email. To support this scenario I add index for Email column. In Package Manager Console I run PowerShell commands to enable migrations and add new migration AspNetUsersEmailIndex:

Enable-Migrations
Add-Migration AspNetUsersEmailIndex

In generated skeleton of AspNetUsersEmailIndex migration class was added code to create index for Email column:

public partial class AspNetUsersEmailIndex : DbMigration
{
    public override void Up()
    {
        CreateIndex("dbo.AspNetUsers", "Email");
    }

    public override void Down()
    {
        DropIndex("dbo.AspNetUsers", new[] { "Email" });
    }
}

Running update database command I got T-SQL of migration:

Update-Database -TargetMigration AspNetUsersEmailIndex -Script

Generated T-SQL script contains CREATE INDEX command:

CREATE INDEX [IX_Email] ON [dbo].[AspNetUsers]([Email])