Configure Microsoft SQL Server using PowerShell

Some time ago I created automatized installation of SharePoint. One of this set of scripts was script for configuration of clean MSSQL installation. Script uses SQL Server Management Objects (SMO) as API for MSSQL manangement:

# Load assemblies
[System.Reflection.Assembly]::LoadWithPartialName("Microsoft.SqlServer.Smo") | Out-Null
[System.Reflection.Assembly]::LoadWithPartialName("Microsoft.SqlServer.SqlEnum") | Out-Null
[System.Reflection.Assembly]::LoadWithPartialName("Microsoft.SqlServer.ConnectionInfo") | Out-Null

$connection = New-Object Microsoft.SqlServer.Management.Common.ServerConnection
$server = New-Object Microsoft.SqlServer.Management.Smo.Server $connection

# Create login for SP2016\Administrator
$login = New-Object Microsoft.SqlServer.Management.Smo.Login $server, "SP2016\Administrator"
$login.LoginType = [Microsoft.SqlServer.Management.Smo.LoginType]::WindowsUser
$login.Create()
$login.AddToRole("sysadmin")

# Create login for SP2016\SP_Admin
$login = New-Object Microsoft.SqlServer.Management.Smo.Login $server, "SP2016\SP_Admin"
$login.LoginType = [Microsoft.SqlServer.Management.Smo.LoginType]::WindowsUser
$login.Create()
$login.AddToRole("dbcreator")
$login.AddToRole("securityadmin")

# Set max. server memory
$server.Configuration.MaxServerMemory.ConfigValue = 2048
$server.Configuration.Alter()


Udemy course: Improve your productivity with PowerShell

PowerShell script at the start loads SMO assemblies and connects to the local MSSQL instance. Then creates logins from domain accounts and add it to server roles. At the end the script set maximum memory which can MSSQL allocate for ist operation.

If you are interested in PowerShell automation, take my Udemy course Improve your productivity with PowerShell.

Analyse Redis cache usage with PowerShell

At the load tests I need to analyse communication between web servers and Redis Cache. My target was to have a statistics with most accessed cache keys. To get required stasticts I run MONITOR command to collect data from Redis cache usage to file using redis-cli command:

.\redis-cli.exe -h <redis_host> -a <redis_access_key> monitor > monitor.log


Udemy course: Improve your productivity with PowerShell

Then I run load test to create traffic on web servers. After the load test I stop MONITOR command using CTRL+C. Statistics is created from usage of GET command. Raw monitor.log file is processed by following PowerShell command:

Get-Content .\monitor.log `
 | Select-String " ""GET"" " `
 | ForEach-Object { $_.ToString().Split(@(" ""GET"" "), [System.StringSplitOptions]::None)[1] } `
 | Group-Object `
 | Sort-Object -Property Count -Descending `
 | Format-Table -Property Count,Name

Result of PowerShell command is summary statistics with most accessed cache keys:

Count Name
----- ----
 2570 "OrderService_OrderService_Orders_STATE"
 2570 "OrderService_OrderService_Orders"
  261 "Test_a2/product/detail/1"
  225 "Test_a2/product/detail/1HQNnoneV+n+FCDE"
  211 "Test_a2/product/category/1"
  211 "ProductService_ProductService_Product_1_STATE"
  202 "Test_a2/product/detail/1"
  196 "ProductService_ProductService_Product_1"   

If you are interested in PowerShell automation, take my Udemy course Improve your productivity with PowerShell.

Azure WebJobs or how to migrate Windows Service to Azure

Some time ago I solved problem how to migrate solution consisting from ASP.NET MVC website, Microsoft SQL Server DB and Windows Service to Microsoft Azure.


Udemy course: Migrate Windows service to Azure

Migration of website and DB is straightforward, but migration of Windows Service can be realized different ways. Purpose of Windows Service was act as runtime for execution of scheduled jobs using Timer, which run every 60 seconds to execute scheduled jobs as can be seen in source code:

public partial class JobSchedulerService : System.ServiceProcess.ServiceBase
{
    private Timer timer;

    protected override void OnStart(string[] args)
    {
        timer = new Timer();
        timer.Elapsed += OnTimer;
        timer.Interval = 60 * 1000;  // 60 seconds
        timer.AutoReset = false;
        timer.Start();
    }

    protected override void OnStop()
    {
        timer.Stop();
    }

    private void OnTimer(object sender, ElapsedEventArgs e)
    {
        JobExecutor.ExecuteScheduledJobs();
    }
}

JobSchedulerService execute JobExecutor.ExecuteScheduledJobs() method every 60 seconds. I found 3 options how to migrate this component into Azure infrastructure:

1. Azure Virtual Machine

Pros

  • No code changes in Windows Service required
  • The same deployment method as at on premise solution

Cons

  • Price of Azure VM

2. Azure Cloud Service

Pros

  • Scalability

Cons

  • Price of Azure Cloud Service
  • Complex code changes required

3. Azure WebJob

Pros

  • No price of Azure WebJob because it is part od Azure App Service

Cons

  • Minimal code changes required

Due to cost I decided for Azure WebJob. Transformation of Windows Service to Azure WebJob is simple. I created Azure WebJob project with the following implementation of Program and Function classes:

public class Program
{
    static void Main()
    {
        var host = new JobHost();
        host.Call(typeof(Functions).GetMethod("ExecuteJobs"));
    } 
}

public class Functions
{
    [NoAutomaticTrigger]
    public static void ExecuteJobs()
    {
        JobExecutor.ExecuteScheduledJobs();
    } 
}

Then I created ZIP package from build output and uploaded it to Azure Portal with WebJob type Triggered and CRON schedule “0 * * * * *” to execute every 60 seconds.

If you are interested about more detailed step by step instructions, take my Udemy course Migrate Windows service to Azure. This course describes all aspects of migration Windows service to Azure and help you to find and implement cost effective solution, which help you to save the money in future.

ASP.NET Identity performance tips

At load tests of web application using ASP.NET Identity 2.2.1 I turned on Microsoft SQL Server Query Store to monitor performance of T-SQL queries. Analyzing the results I suggest following tips to improve performance of ASP.NET Identity:

1. Disable checks of schema version

As for exec count, the following query was on the first place:

SELECT COLUMN_NAME FROM INFORMATION_SCHEMA.COLUMNS where TABLE_NAME=@Table

After some search in source code of ASP.NET Identity I found internal IsIdentityV1Schema method in IdentityDbContext class. This method runs mentioned query to check version of schema, whether DB contains ASP.NET Identity 1.0 schema. To avoid this DB roundtrips you have to set parameter throwIfV1Schema to false in constructor of IdentityDbContext class as shown in code:

public class ApplicationDbContext : IdentityDbContext<ApplicationUser>
{
    public ApplicationDbContext()
        : base("DefaultConnection", throwIfV1Schema: false)
    {
    }
}

The interesting on this issue is fact, that this is set when you create web application project from default template in Visual Studio 2015, but I wrote this code manually, so I didn’t consider the importance of this parameter.

2. Avoid usage of T-SQL UPPER function

When selecting user by username the following query is executed:

SELECT TOP (1)
    [Extent1].[Id] AS [Id],
    [Extent1].[Email] AS [Email],
    [Extent1].[EmailConfirmed] AS [EmailConfirmed],
    [Extent1].[PasswordHash] AS [PasswordHash],
    [Extent1].[SecurityStamp] AS [SecurityStamp],
    [Extent1].[PhoneNumber] AS [PhoneNumber],
    [Extent1].[PhoneNumberConfirmed] AS [PhoneNumberConfirmed],
    [Extent1].[TwoFactorEnabled] AS [TwoFactorEnabled],
    [Extent1].[LockoutEndDateUtc] AS [LockoutEndDateUtc],
    [Extent1].[LockoutEnabled] AS [LockoutEnabled],
    [Extent1].[AccessFailedCount] AS [AccessFailedCount],
    [Extent1].[UserName] AS [UserName]
    FROM [dbo].[AspNetUsers] AS [Extent1]
    WHERE ((UPPER([Extent1].[UserName])) = (UPPER(@p__linq__0))) OR ((UPPER([Extent1].[UserName]) IS NULL) AND (UPPER(@p__linq__0) IS NULL))

Query contains UPPER function which disables usage of index created on UserName column. Execution plan for query is:

Query execution plan

Studying default implementation of UserStore class I found that method FindByNameAsync contains LINQ predicate with ToUpper method. This default behaviour can be overriden creating custom UserStore implementation:

public class ApplicationUserStore : UserStore<ApplicationUser>
{
    public ApplicationUserStore(ApplicationDbContext context)
        : base(context)
    {
    }

    public override Task<ApplicationUser> FindByEmailAsync(string email)
    {
        return GetUserAggregateAsync(u => u.Email == email);
    }

    public override Task<ApplicationUser> FindByNameAsync(string userName)
    {
        return GetUserAggregateAsync(u => u.UserName == userName);
    }
}

Than at creating UserManager only use custom UserStore implementation:

public class ApplicationUserManager : UserManager<ApplicationUser>
{
    public ApplicationUserManager(IUserStore<ApplicationUser> store)
        : base(store)
    {
    }

    public static ApplicationUserManager Create(IdentityFactoryOptions<ApplicationUserManager> options, IOwinContext context) 
    {
        var manager = new ApplicationUserManager(new ApplicationUserStore(context.Get<ApplicationDbContext>()));
        // ...
    }
}

After this customization UPPER function is no longer present in query:

SELECT TOP (1)
    [Extent1].[Id] AS [Id],
    [Extent1].[Email] AS [Email],
    [Extent1].[EmailConfirmed] AS [EmailConfirmed],
    [Extent1].[PasswordHash] AS [PasswordHash],
    [Extent1].[SecurityStamp] AS [SecurityStamp],
    [Extent1].[PhoneNumber] AS [PhoneNumber],
    [Extent1].[PhoneNumberConfirmed] AS [PhoneNumberConfirmed],
    [Extent1].[TwoFactorEnabled] AS [TwoFactorEnabled],
    [Extent1].[LockoutEndDateUtc] AS [LockoutEndDateUtc],
    [Extent1].[LockoutEnabled] AS [LockoutEnabled],
    [Extent1].[AccessFailedCount] AS [AccessFailedCount],
    [Extent1].[UserName] AS [UserName]
    FROM [dbo].[AspNetUsers] AS [Extent1]
    WHERE [Extent1].[UserName] = @p__linq__0

Execution plan for query is now:

Query execution plan

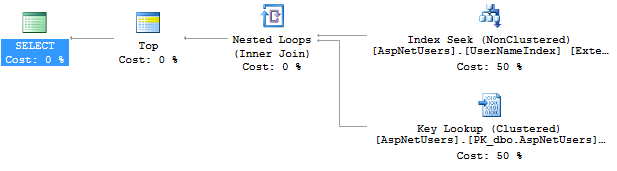
This solution assumes that DB uses case insensitive collation.

3. Index Email column

In my web application there was also many scenarios where users were queried by email. To support this scenario I add index for Email column. In Package Manager Console I run PowerShell commands to enable migrations and add new migration AspNetUsersEmailIndex:

Enable-Migrations
Add-Migration AspNetUsersEmailIndex

In generated skeleton of AspNetUsersEmailIndex migration class was added code to create index for Email column:

public partial class AspNetUsersEmailIndex : DbMigration
{
    public override void Up()
    {
        CreateIndex("dbo.AspNetUsers", "Email");
    }

    public override void Down()
    {
        DropIndex("dbo.AspNetUsers", new[] { "Email" });
    }
}

Running update database command I got T-SQL of migration:

Update-Database -TargetMigration AspNetUsersEmailIndex -Script

Generated T-SQL script contains CREATE INDEX command:

CREATE INDEX [IX_Email] ON [dbo].[AspNetUsers]([Email])

Passive income for programmers

This post describes options for creating passive income with explanation of basic steps you need to execute to be successfull and earn some money.

What is passive income?

First you need to understand difference between active income and passive income. Active income is dependent on the quantity of hours you work. For example when you work 100 hours and your hour tax is $30 per hour you will earn $3000. Passive income is not dependent on the quantity of hours you work. You create something at the beginning and it makes money for you for a long period. You spent only minimal amount of time to maintain this income. Benefits of passive income:

  • You earn money even if you sleep or you are on holidays
  • You get more time for you, your family and friends
  • You can spent more time with your hobbies
  • You spent more time on your project which can shift you to your targets in the future and you don’t have to spent time on projects of your employeer

What changed internet

In the past passive income was related to especially real estate business. Typically you own some house or flat and rent if for money. Internet revolution created new options and opportunities for creating passive income streams.

Passive income options for programmers

Programmers can establish passive income this ways:

1. Tematic website

You create website with some interesting content. Content is a king when you want to attract people to your web site. Setup Google Analytics to analyse traffic to your website and then setup Google AdSense‎ to earn money on ads.

2. Blog

This passive income idea is very similar to tematic website. Choose topic you want to write about and then create blog using some blogging platform, for example WordPress‎. Setup Google Analytics to analyse traffic to your website and then setup Google AdSense‎ to earn money on ads.

3. Mobile app

At the beginning choose the mobile platform: Android, iOS, Windows Phone. Then choose monetization model: free app with ads, paid app, in-app purchase (IAP). Create mobile app and publish it to store. Setup Google Analytics and integrate it into mobile app to analyse usage of your app.

4. Udemy course

Udemy‎ is modern e-learning platform with big potencial for students and also for instructors. At the beginning choose the topic, you can inspire from Udemy website, Udemy hot topics or Google Trends. Then create the video course. Course creation process in not easy.
It takes me 30 hours of work when creating my first Udemy course with duration of 30 minutes. After publishing of course you should promote your course to build audience of students.

5. Kindle ebook

Choose ebook topic, you can inspire by Amazon‎ website or by Google Trends. Then publish and promote it.

6. Custom library

In the past you probably create some piece of code or library for solving some specific problem and you and your colleagues used it on many projects. If you think that this library can help also other people, you can earn some money on it. Setup website for selling this library, choose license and setup payment method for example PayPal‎.

If you are interested about more detailed step by step instructions, take my Udemy course Passive income for programmers. This course describes all aspects of creating passive income as programmer.